
Search, filter, and group records
Odoo allows for the searching, filtering, and grouping of records in a view to display only the most relevant records. The search bar is located at the top of the view: start typing to search for values, or click the (dropdown) icon to access the Filter, Group By, and Favorites drop-down menus.
Search for values
Use the search field to look for specific values, and add them as a filter. Type the value to search for (like a salesperson's name or a product), and select the desired option from the drop-down menu to apply the search filter.
Filters
Filters are used to select records that meet specific criteria. The default selection of records is specific to each view, but can be modified by selecting one (or several) preconfigured filters, or by adding a custom filter.
Preconfigured filters
Modify the default selection of records by clicking the (dropdown) from the search bar, and selecting one (or several) preconfigured filters from the Filters drop-down menu.
Custom filters
If the preconfigured filters are not specific enough, add a custom filter. To do so, click the (dropdown) icon in the search bar, then select Filters -> Add Custom Filter.
The Add Custom Filter pop-up window displays the matching option, filter rule, and a toggle to Include archived records.
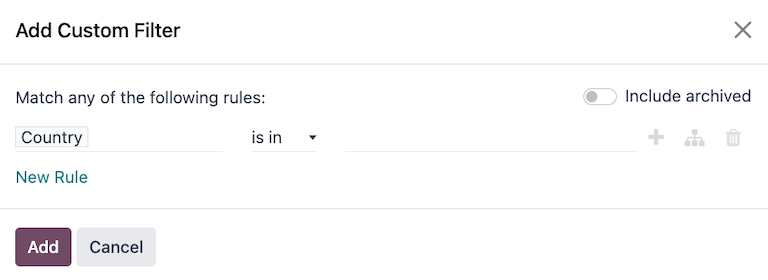
The default matching configuration is to Match any of the following rules, indicating that each filter rule is applied independently. To change the matching configuration to Match all of the following rules, at least two filter rules must be added to the custom filter.
- Match all of the following rules: All of the filter rules must be met. Think of this as an AND (
&) operation. - Match any of the following rules: Any of the filter rules can be met. Think of this as an OR (
|) operation.
By default, a single filter rule is added to the custom filter. The following describes the structure of a filter rule:
- The first inline field is the field name to filter by. Some fields have refined parameters that are nested within another field. These fields have a (submenu) icon beside them, which can be selected to reveal the nested fields.
- The second inline field is the conditional operator used to compare the field name to the value. The available conditional operators are specific to the field's data type.
- The third inline field is the variable value of the field name. The value input may appear as a drop-down menu, a text input, a number input, a date/time input, a boolean selector, or it may be blank, depending on the operator used and the field's data type.
Three inline buttons are also available to the right of the rule's filter criteria:
-
(plus): Adds a new rule below the existing rule.
-
(node): Adds a new group of rules below the existing rule, with the any and all matching options available to define how each rule within this branch is applied to the filter. If the matching option is set to the same as the parent group, the fields are moved to join the parent group.
-
(delete): Deletes the node. If a branch node is deleted, all children of that node are deleted, as well.
A new filter rule can be added to the custom filter by clicking the New Rule button.
Once the filter criteria are defined, click Add to add the custom filter to the view.
Group records
The display of records in a view can be clustered together, according to one of the preconfigured groups. To do so, click the (dropdown) icon in the search bar, then select one of the Group By options from the drop-down menu.
It is possible to customize groups by using a field present on the model. To do so, click Add Custom Group, and select a field from the drop-down menu.
Comparison
Certain reporting dashboards include a Comparison section in the drop-down menus of their search bars. This includes the Overall Equipment Effectiveness report for the Manufacturing app and the Purchase report for the Purchase app, among others.
The options in the Comparison section are used to compare data from two different time periods. Pick between the two comparison options: (Time Filter): Previous Period and (Time Filter): Previous Year.
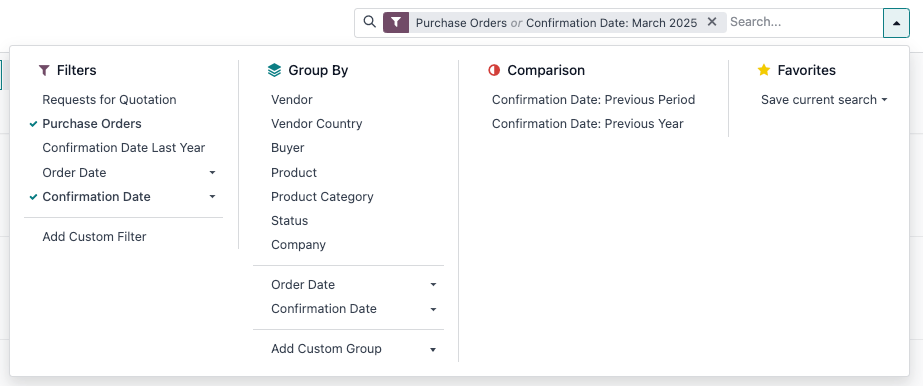
To view data using one of the two comparisons, begin by selecting a time period in the Filters column of the search bar drop-down menu. Then, select either (Time Filter): Previous Period or (Time Filter): Previous Year in the Comparison section.
With one of the Comparison options enabled, the report compares the data for the selected period, with the data for the same unit of time (month, quarter, year), one period or year prior. The way the data is displayed depends on the selected view:
- The (Bar Chart) shows two bars, side-by-side, for each unit of time for the selected time period. The left bar represents the selected time period, while the right bar represents the previous time period.
- The (Line Chart) is displayed with two lines, one representing the selected time period, and the other representing the previous time period.
- The (Pie Chart) appears as a large circle with a smaller circle inside. The larger circle represents the selected time period, while the smaller circle represents the previous time period.
- The (Pivot) is displayed with each column split into two smaller columns. The right column represents the selected time period, while the left column represents the previous time period.
Favorites
Favorites are a way to save a specific search for future use, or as the new default filter for the view.
To save the current view as a favorite, click the (dropdown) icon in the search bar, then select the Save current search drop-down menu to display the following options:
- Filter name: Name of the favorited search.
- Default filter: Sets the favorited search as the default filter for the view.
- Shared: Makes the favorited search available to all users. Otherwise, by default, the favorited search is only available to the user who created it.
Once the options are set, click Save to save the favorited search.
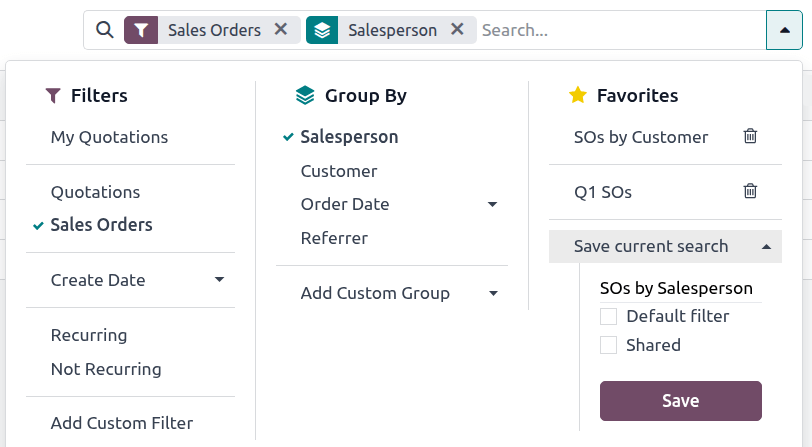
Favorited searches are accessed by clicking the (dropdown) icon in the search bar, and are shown under Favorites. Searches that are only visible to the current user, i.e., that are not shared, are shown first, while any shared favorites, whether created by the current user or another user, are shown in a second section.
To remove a favorited search, click the (delete) icon next to the saved search.