
Vendor bills
Standard Odoo workflow. Also read the KMEE procedure for the Brazilian modules.
Vendor bills can be registered either manually or automatically in Odoo. The Aged Payable report provides an overview of all outstanding bills to help ensure timely payment of the correct amounts.
See also
Bill creation
Manually
To create a vendor bill manually, go to Accounting -> Vendors -> Bills and click New.
Automatically
Vendor bills can be automatically created by sending an email to an email alias associated with the purchase journal, or by uploading a PDF in Accounting -> Vendors -> Bills and then clicking Upload.
Bill completion
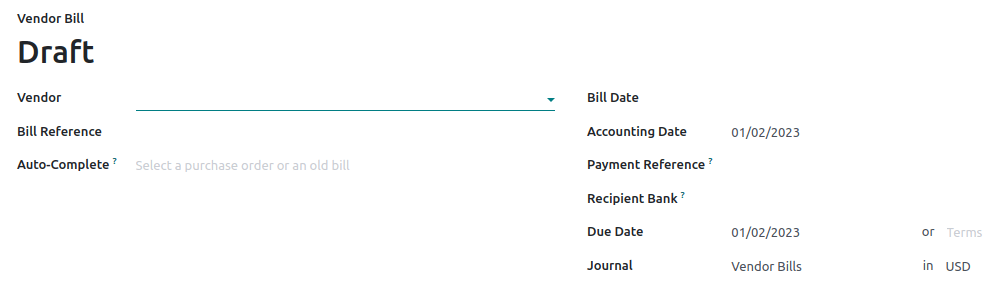
Whether the bill is created manually or automatically, make sure the following fields are appropriately completed:
-
Vendor: Odoo automatically fills in some information based on the information on the vendor's contact record as well as previous purchase orders and bills.
-
Bill Reference: Add the sales order reference provided by the vendor. This field is used to match the products when they are received.
-
Auto-Complete: Select a past bill/purchase order to complete the document automatically. The Vendor field should be completed before completing this field.
-
Bill Date: Select the document's issuance date.
-
Accounting Date: Update the document's accounting registration date if needed.
-
-
Payment Reference: Automatically indicated in the Memo field when
-
registering the payment.
-
-
Recipient Bank: Indicates the account number to which the payment will be made. This field is required when paying via batch payment files (such as NACHA and SEPA).
-
Due Date or Terms for paying the bill.
-
Journal: Select which journal should record the bill and in which currency.
Bill confirmation
Click Confirm when the document is completed. The status changes to Posted, and a journal entry is generated based on the vendor bill information.
Payment and reconciliation
To register a payment, click on Register Payment. In the Register Payment window, select the Journal, the Payment Method, the Amount, and the Currency.
When the Amount paid is less than the total remaining amount on the vendor bill, the payment is partial, and the Payment Difference field displays the outstanding balance.
The Memo field is filled automatically if the Payment Reference has been set correctly on the vendor bill. If the field is empty, select the vendor invoice number as a reference.
Then click Create payment. An In Payment/Partial banner appears on the bill until it is reconciled and its status updates to Paid.
See also
- Payments
- Bank reconciliation
Aged payable report
To get an overview of the open vendor bills and their due dates, go to Accounting -> Reporting -> Aged payable.
Click the (right arrow) icon next to a vendor to view the details of all their outstanding bills, including the due dates and amounts.